https://inguide.in/how-to-install-free-ssl-certificate-on-zimbra-mail-server/
Je change le domaine ingu.pw
In the article Install Zimbra Mail Server on CentOS 8, we learned to install Zimbra on CentOS. This article discusses the steps required to install the Let’s Encrypt free SSL certificate in Zimbra.
Installing Free SSL Certificate on Zimbra: Method 1
This method is a proven one though you have to manually do all the steps. Another method discussed below is partially automatic, which might come in handy if you didn’t encounter any error during installation (working at the time of writing this article). So, let’s begin with method 1.
First of all, add epel repository to the server
1 | [root@mail ~]# yum -y install epel-release |
Install snapd
Now, install snapd package with the following command
1 | [root@mail ~]# sudo yum install snapd |
After the above step, you need to enable snapd.
1 | [root@mail ~]# sudo systemctl enable --now snapd.socket |
Sometimes, the above command isn’t sufficient. Therefore, to enable classic snap support, create a symbolic link between /var/lib/snapd/snap and /snap:
1 | [root@mail ~]# sudo ln -s /var/lib/snapd/snap /snap |
Now install snap core
1 | [root@mail ~]# sudo snap install core; sudo snap refresh core |
Install certbot
Now, we need to get certbot
1 | [root@mail ~]# sudo snap install --classic certbot |
After that, prepare the certbot command
1 | [root@mail ~]# sudo ln -s /snap/bin/certbot /usr/bin/certbot |
Now, get the certificate
1 2 3 4 5 6 7 8 | [root@mail ~]# sudo certbot certonly --standalone --preferred-chain "ISRG Root X1"Saving debug log to /var/log/letsencrypt/letsencrypt.logHow would you like to authenticate with the ACME CA?- - - - - - - - - - - - - - - - - - - - - - - - - - - - - - - - - - - - - - - -1: Spin up a temporary webserver (standalone)2: Place files in webroot directory (webroot)- - - - - - - - - - - - - - - - - - - - - - - - - - - - - - - - - - - - - - - - |
Next, answer 1 and enter the domain as mail.yourdomain.com Toujours 1
1 2 3 4 5 6 7 8 9 10 11 12 13 14 15 16 17 18 19 20 21 22 23 24 | Select the appropriate number [1-2] then [enter] (press 'c' to cancel): 1Plugins selected: Authenticator standalone, Installer NonePlease enter in your domain name(s) (comma and/or space separated) (Enter 'c'to cancel): mail.ingu.pwRequesting a certificate for mail.ingu.pwPerforming the following challenges:http-01 challenge for mail.ingu.pwWaiting for verification...Cleaning up challengesSubscribe to the EFF mailing list (email: admin@ingu.pw).IMPORTANT NOTES: - Congratulations! Your certificate and chain have been saved at: /etc/letsencrypt/live/mail.ingu.pw/fullchain.pem Your key file has been saved at: /etc/letsencrypt/live/mail.ingu.pw/privkey.pem Your certificate will expire on 2021-08-07. To obtain a new or tweaked version of this certificate in the future, simply run certbot again. To non-interactively renew *all* of your certificates, run "certbot renew" - If you like Certbot, please consider supporting our work by: Donating to ISRG / Let's Encrypt: https://letsencrypt.org/donate Donating to EFF: https://eff.org/donate-le |
Installing Certificate
Now copy the privkey.pem to the directory as written in commnad.
1 2 | [root@mail ~]# cp /etc/letsencrypt/live/mail.ingu.pw/privkey.pem /opt/zimbra/ssl/zimbra/commercial/commercial.key[root@mail ~]# chown zimbra:zimbra /opt/zimbra/ssl/zimbra/commercial/commercial.key |
Next, you need to edit chain.pem file and append root CA to it. Actually, Let’s Encrypt generate chain.pem file without the root CA. Therefore, you must use the IdenTrust root Certificate and merge it and append it in chain.pem. To get the IdenTrust root Certificate go to the following link.
1 2 | [root@mail ~]# wget -O /tmp/ISRG-X1.pem https://letsencrypt.org/certs/isrgrootx1.pem.txt[root@mail ~]# cat /tmp/ISRG-X1.pem >> /etc/letsencrypt/live/mail.ingu.pw/chain.pem |
Verify your certificate
Now create a directory /opt/zimbra/ssl/letsencrypt and copy all the certificate files.
1 2 | [root@mail ~]:~# mkdir /opt/zimbra/ssl/letsencrypt[root@mail ~]# cp /etc/letsencrypt/live/mail.yourdomain.com/* /opt/zimbra/ssl/letsencrypt/ |
Next change the ownership of files.
1 2 | [root@mail ~]# chown zimbra:zimbra /opt/zimbra/ssl/letsencrypt/*[root@mail ~]# ls -la /opt/zimbra/ssl/letsencrypt/ |
After that switch to zimbra user and change working directory.
1 2 | [root@mail ~]# su zimbra[zimbra@mail root]$ cd /opt/zimbra/ssl/letsencrypt/ |
Now, it’s time to verify the certificate finally.
1 2 3 4 5 | [zimbra@mail letsencrypt]$ /opt/zimbra/bin/zmcertmgr verifycrt comm privkey.pem cert.pem chain.pem** Verifying 'cert.pem' against 'privkey.pem'Certificate 'cert.pem' and private key 'privkey.pem' match.** Verifying 'cert.pem' against 'chain.pem'Valid certificate chain: cert.pem: OK |
You will get OK message at the end of successful verification.
Deploy Certificate
After all the hard work finally, you have reached the deployment stage. Execute the following 2 commands to finish SSL installation.
1 2 3 4 5 6 7 8 9 10 11 12 13 14 15 16 17 18 19 20 21 22 23 24 25 26 27 28 29 30 31 32 33 34 35 36 37 38 39 40 41 42 43 44 45 46 | [zimbra@mail letsencrypt]$ cp /opt/zimbra/ssl/letsencrypt/privkey.pem /opt/zimbra/ssl/zimbra/commercial/commercial.key[zimbra@mail letsencrypt]$ /opt/zimbra/bin/zmcertmgr deploycrt comm cert.pem chain.pem** Verifying 'cert.pem' against '/opt/zimbra/ssl/zimbra/commercial/commercial.key'Certificate 'cert.pem' and private key '/opt/zimbra/ssl/zimbra/commercial/commercial.key' match.** Verifying 'cert.pem' against 'chain.pem'Valid certificate chain: cert.pem: OK** Copying 'cert.pem' to '/opt/zimbra/ssl/zimbra/commercial/commercial.crt'** Copying 'chain.pem' to '/opt/zimbra/ssl/zimbra/commercial/commercial_ca.crt'** Appending ca chain 'chain.pem' to '/opt/zimbra/ssl/zimbra/commercial/commercial.crt'** Importing cert '/opt/zimbra/ssl/zimbra/commercial/commercial_ca.crt' as 'zcs-user-commercial_ca' into cacerts '/opt/zimbra/common/lib/jvm/java/lib/security/cacerts'** NOTE: restart mailboxd to use the imported certificate.** Saving config key 'zimbraSSLCertificate' via zmprov modifyServer mail.ingu.pw...ok** Saving config key 'zimbraSSLPrivateKey' via zmprov modifyServer mail.ingu.pw...ok** Installing imapd certificate '/opt/zimbra/conf/imapd.crt' and key '/opt/zimbra/conf/imapd.key'** Copying '/opt/zimbra/ssl/zimbra/commercial/commercial.crt' to '/opt/zimbra/conf/imapd.crt'** Copying '/opt/zimbra/ssl/zimbra/commercial/commercial.key' to '/opt/zimbra/conf/imapd.key'** Creating file '/opt/zimbra/ssl/zimbra/jetty.pkcs12'** Creating keystore '/opt/zimbra/conf/imapd.keystore'** Installing ldap certificate '/opt/zimbra/conf/slapd.crt' and key '/opt/zimbra/conf/slapd.key'** Copying '/opt/zimbra/ssl/zimbra/commercial/commercial.crt' to '/opt/zimbra/conf/slapd.crt'** Copying '/opt/zimbra/ssl/zimbra/commercial/commercial.key' to '/opt/zimbra/conf/slapd.key'** Creating file '/opt/zimbra/ssl/zimbra/jetty.pkcs12'** Creating keystore '/opt/zimbra/mailboxd/etc/keystore'** Installing mta certificate '/opt/zimbra/conf/smtpd.crt' and key '/opt/zimbra/conf/smtpd.key'** Copying '/opt/zimbra/ssl/zimbra/commercial/commercial.crt' to '/opt/zimbra/conf/smtpd.crt'** Copying '/opt/zimbra/ssl/zimbra/commercial/commercial.key' to '/opt/zimbra/conf/smtpd.key'** Installing proxy certificate '/opt/zimbra/conf/nginx.crt' and key '/opt/zimbra/conf/nginx.key'** Copying '/opt/zimbra/ssl/zimbra/commercial/commercial.crt' to '/opt/zimbra/conf/nginx.crt'** Copying '/opt/zimbra/ssl/zimbra/commercial/commercial.key' to '/opt/zimbra/conf/nginx.key'** NOTE: restart services to use the new certificates.** Cleaning up 3 files from '/opt/zimbra/conf/ca'** Removing /opt/zimbra/conf/ca/c9124eb4.0** Removing /opt/zimbra/conf/ca/ca.pem** Removing /opt/zimbra/conf/ca/ca.key** Copying CA to /opt/zimbra/conf/ca** Copying '/opt/zimbra/ssl/zimbra/ca/ca.key' to '/opt/zimbra/conf/ca/ca.key'** Copying '/opt/zimbra/ssl/zimbra/ca/ca.pem' to '/opt/zimbra/conf/ca/ca.pem'** Creating CA hash symlink 'c9124eb4.0' -> 'ca.pem'** Creating /opt/zimbra/conf/ca/commercial_ca_1.crt** Creating CA hash symlink '8d33f237.0' -> 'commercial_ca_1.crt'** Creating /opt/zimbra/conf/ca/commercial_ca_2.crt** Creating CA hash symlink '4042bcee.0' -> 'commercial_ca_2.crt'** Creating /opt/zimbra/conf/ca/commercial_ca_3.crt** Creating CA hash symlink '2e5ac55d.0' -> 'commercial_ca_3.crt' |
At last, just restart the Zimbra services to reload newly installed cerificate
1 2 3 4 5 6 7 8 9 10 11 12 13 14 15 16 17 18 19 20 21 22 23 24 25 26 27 28 29 30 31 32 33 34 35 36 37 38 39 40 41 42 | [zimbra@mail letsencrypt]$ zmcontrol restartHost mail.ingu.pw Stopping zmconfigd...Done. Stopping zimlet webapp...Done. Stopping zimbraAdmin webapp...Done. Stopping zimbra webapp...Done. Stopping service webapp...Done. Stopping stats...Done. Stopping mta...Done. Stopping spell...Done. Stopping snmp...Done. Stopping cbpolicyd...Done. Stopping archiving...Done. Stopping opendkim...Done. Stopping amavis...Done. Stopping antivirus...Done. Stopping antispam...Done. Stopping proxy...Done. Stopping memcached...Done. Stopping mailbox...Done. Stopping logger...Done. Stopping dnscache...Done. Stopping ldap...Done.Host mail.ingu.pw Starting ldap...Done. Starting zmconfigd...Done. Starting logger...Done. Starting mailbox...Done. Starting memcached...Done. Starting proxy...Done. Starting amavis...Done. Starting antispam...Done. Starting antivirus...Done. Starting opendkim...Done. Starting snmp...Done. Starting spell...Done. Starting mta...Done. Starting stats...Done. Starting service webapp...Done. Starting zimbra webapp...Done. Starting zimbraAdmin webapp...Done. Starting zimlet webapp...Done. |
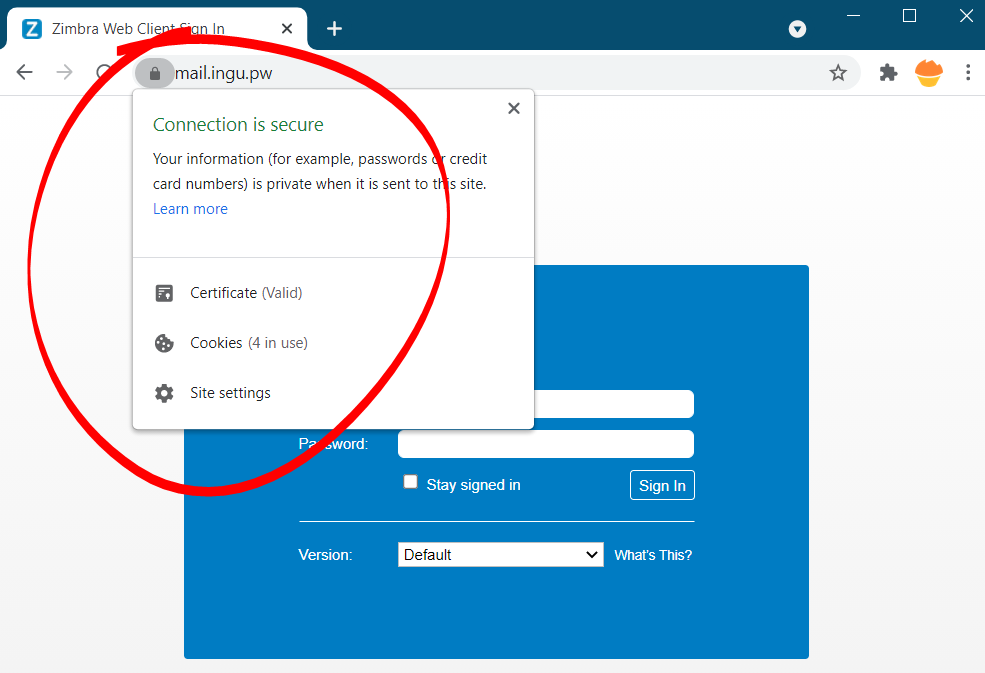
Now, go and check new SSL certificate in browser
Test Automatic Renewal
The certbot packages are pre configured to automatically renew SSL certificate before expiry. You don’t have to execute any command in order to renew the certificate, unless you have changed the configuration. However, here’s the command which will simulate the automatic renewal and confirm the working of cron or systemd properly.
1 2 3 4 5 6 7 8 9 10 11 12 13 14 15 16 17 18 19 20 21 22 23 24 | [root@mail ~]# sudo certbot renew --dry-runSaving debug log to /var/log/letsencrypt/letsencrypt.log- - - - - - - - - - - - - - - - - - - - - - - - - - - - - - - - - - - - - - - -Processing /etc/letsencrypt/renewal/mail.ingu.pw.conf- - - - - - - - - - - - - - - - - - - - - - - - - - - - - - - - - - - - - - - -Cert not due for renewal, but simulating renewal for dry runPlugins selected: Authenticator standalone, Installer NoneAccount registered.Simulating renewal of an existing certificate for mail.ingu.pwPerforming the following challenges:http-01 challenge for mail.ingu.pwWaiting for verification...Cleaning up challenges- - - - - - - - - - - - - - - - - - - - - - - - - - - - - - - - - - - - - - - -new certificate deployed without reload, fullchain is/etc/letsencrypt/live/mail.ingu.pw/fullchain.pem- - - - - - - - - - - - - - - - - - - - - - - - - - - - - - - - - - - - - - - -- - - - - - - - - - - - - - - - - - - - - - - - - - - - - - - - - - - - - - - -Congratulations, all simulated renewals succeeded: /etc/letsencrypt/live/mail.ingu.pw/fullchain.pem (success)- - - - - - - - - - - - - - - - - - - - - - - - - - - - - - - - - - - - - - - - |
This method though little lengthy, but it is guaranteed to work 99% of the time.
Commentaires
Enregistrer un commentaire