ici quelques notions de bases que je vous invite à lire avant de commencer
Basculer un clavier en AZERTY ou en QWERTY sous Linux
setxkbmap fr
Se connecter en adminstrateur
su - root
yum update ( Yellowdog Updater, Modified )
cPanel is one of the most popular Commercial control panel for Linux web hosting, I have been working with cPanel for 2+ years to manage all Shared, Reseller and business hosting customers. It comes with cPanel and Web Host Manager, which makes web hosting easier for you. WHM provides you root level access to your server whereas cPanel provides user level access interface to manage their own web hosting account on the server.
Next, execute the auto installer script, but we strongly recommended to run cPanel auto installer script in screen mode if you are doing it with SSH because it takes 3-4+ hours to complete the installation depending on your server resources.
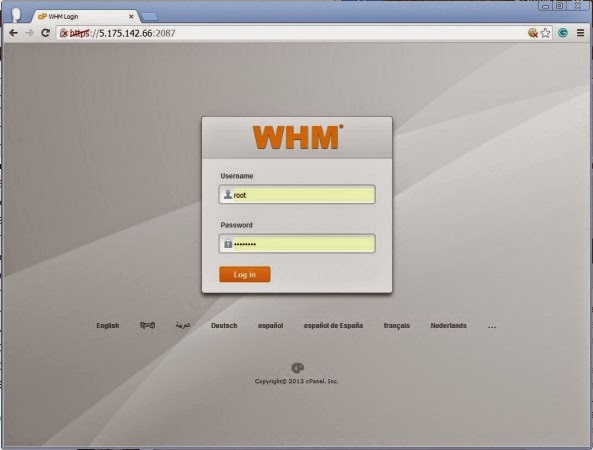
After that you need to complete the installation wizard from its web based interface and you can access WHM with the following URL.
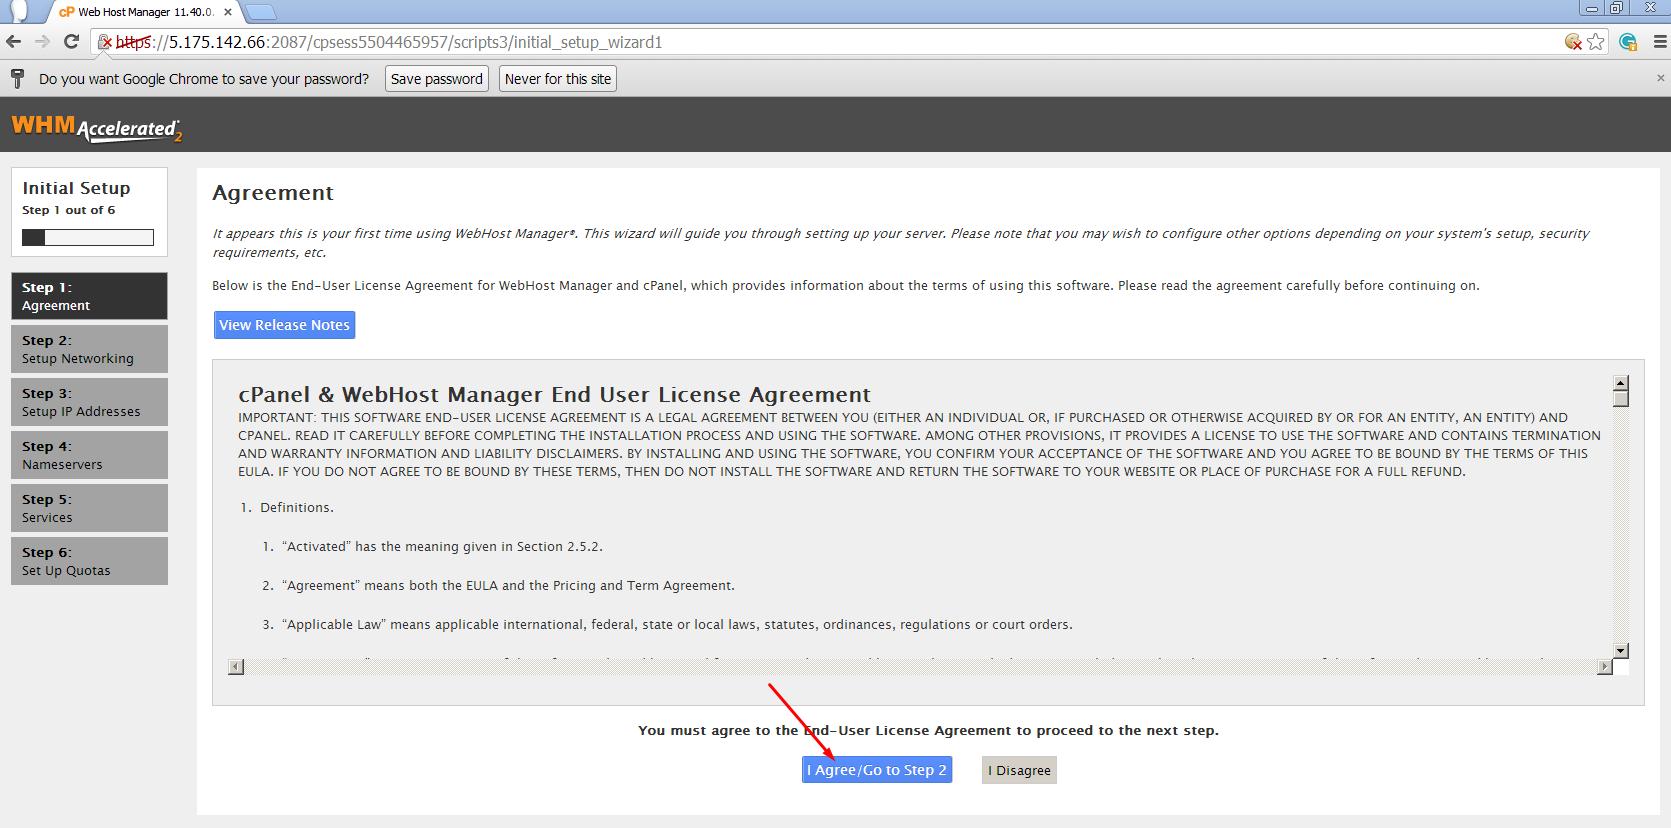
Please login with user “root” and your password. There are some more clicks remaining to complete the cPanel installation. Agree End User License Agreement by clicking “I Agree?/Go to Step 2” button:
 Please do provide the working email address and contact SMS address in the column of “Server Contact Email Address” and “Server contact SMS address” respectively because your cPanel sends all important alerts, notification to this EMail-id (Recommended). You can fill the rest details as well, if you have one.

Please provide a valid FQDN hostname and Resolver entries for your server in this Networking section, you can use Google resolvers in this section if you don’t have your ISP’s resolvers. Please see the image below.

If you have more than one IP attached with your NIC card and you want to set up a specific IP for your Server’s main IP, you can do that from here, to do so please choose the IP from the drop down and click on “Go to Setup 4”.

In the 4th setup wizard, you can select DNS
server which you want to use. You can choose one of them according to
their Advantages, disadvantages and your server resources. Please read
the comparison carefully and select the DNS server. Please see the image
below.

In the same step, please write down Name Servers you want to use in format of ns1/ns2.example.com. Also, Add an A entry for your hostname and nameserver by selecting the check box, please see the image below.

You can select and set up different services like FTP, Mail and Cphulk in the Step 5 of this web based wizard, please see the snapshots and description below.
You can select FTP server of your choice from this wizard, which you want to use for your server depending on their advantages, disadvantages and depending upon your ease and requirements.

In the same wizard, you can select your Mail server to be used for all your mailing activities in future. You can add MTAs like Exim with your cPanel in future.

Cphulk brute force protection detects and block false password attacks activities and block their IP for your server. You can enable/disable and configure it from this installation wizard. Please see the snapshot below.

Last Step 6, allows you to enable quotas which helps you to track down the disk space usages.

Please select “Use file system quotas” and click on “Finish setup wizard” to complete the Installation process. Once you are done with Installation, WHM’s home page will Appear like below..
 You can see that Home page of WHM is displaying all Control panel option and sidebar with search facility which allows you to search options by just typing their names.
Sometimes, cPanel installer script is not able to update the licence because of firewall or resolvers entries and you’ll see trial warning in the page. You can do it manually with following command.

Other Useful thing to know before you start working with Cpanel and WHM.
For now that’s all with Cpanel installation, there are so many features in Cpanel and WHM which help you to setup web hosting environment. If you face any problem with setting up Cpanel in your Linux server or need any other assistance like backups, restorations, migrations etc, you can simply contact us.
Till then, Stay connected with Tecmint.com for more exciting and interesting tutorials in future. Do leave your valuable comments and suggestions below in our comment section.
Basculer un clavier en AZERTY ou en QWERTY sous Linux
setxkbmap fr
Se connecter en adminstrateur
su - root
yum update ( Yellowdog Updater, Modified )
cPanel is one of the most popular Commercial control panel for Linux web hosting, I have been working with cPanel for 2+ years to manage all Shared, Reseller and business hosting customers. It comes with cPanel and Web Host Manager, which makes web hosting easier for you. WHM provides you root level access to your server whereas cPanel provides user level access interface to manage their own web hosting account on the server.
Features of cPanel
cPanel control panel is very versatile control panel for managing your hosting servers, It has lots of features which make Web hosting easier for you. Some of them are listed below:- Powerful GUI controls on your server with WHM.
- Can perform tedious tasks like Backups, Migrations and restorations in a very easy and smooth manner.
- Excellent DNS and mail server management for main server and as well as client account.
- Can easily switch/enable/disable services for server.
- Can configure SSL/TLS for all server services and client domains.
- Easy integration with Phpmyadmin to provide a web based interface to manage your MySQL databases.
- Feel free to Rebrand it.
- Can be easily integrated with WHMCS to automate billing management.
Installation Prerequisites
- A fresh and running VPS or dedicated CentOS 6.5 server.
- A minimum of 384MB RAM.
- A Minimum 20GB of free disk space required for cPanel installation.
- A cPanel license.
Installation of cPanel in RHEL/CentOS 5/6
First insure that OS version on which your Linux box is running, To do so, please use following command.[root@tecmint ~]# cat /etc/redhat-release
CentOS release 6.4 (Final)
If you don’t have the latest version, please update your OS to its latest version, In CentOS and RHEL, we can simply do it with yum package installer.
[root@server1 ~]# yum updateOnce updates completes, and then check the latest OS version with same above command.
[root@server1 ~]# cat /etc/redhat-release

CentOS release 6.5 (Final)
Once you’ve ensured the OS version, you don’t have to install any other dependency package cPanel auto installer script does all for you. We can download cPanel installer file with wget command under /home directory.
root@server1 [~]# cd /home
root@server1 [~]# wget -N http://httpupdate.cpanel.net/latest
Sample Output
--2013-12-18 21:59:23--  http://httpupdate.cPanel.net/latest
Resolving httpupdate.cPanel.net... 208.82.118.100, 208.109.109.239, 209.85.80.214, ...
Connecting to httpupdate.cPanel.net|208.82.118.100|:80... connected.
HTTP request sent, awaiting response... 200 OK
Length: 34087 (33K) [application/octet-stream]
Saving to: `latest'

100%[======================================>] 34,087      42.5K/s   in 0.8s

2013-12-18 21:59:24 (42.5 KB/s) - `latest' saved [34087/34087]
In above output you can see that we have downloaded a file “latest” in our home directory.
Next, execute the auto installer script, but we strongly recommended to run cPanel auto installer script in screen mode if you are doing it with SSH because it takes 3-4+ hours to complete the installation depending on your server resources.
root@server1 [~]# sh latest
Sample Output
Verifying archive integrity... All good.
Uncompressing cPanel & WHM Installer..............
        ____                  _
    ___|  _ \ __ _ _ __   ___| |
   / __| |_) / _` | '_ \ / _ \ |
  | (__|  __/ (_| | | | |  __/ |
   \___|_|   \__,_|_| |_|\___|_|
Installer Version v00029 r6849459174e3809f72de2bef81427a8a45399d66
Beginning main installation.
------------------------------------
------------------------------------
Now, you need to wait for the cPanel installer script to complete its installation.
What Auto Installer Script Does for You
cPanel heavily modifies your operating system and that is the reason that no cPanel Uninstaller available on the web so far, you need to reformat your server to remove cPanel completely from your server.- It checks for various packages to ensure that there will be no conflicts and it finds any package conflict, it uninstalls previous packages with yum and that’s why its recommended to install cPanel on a Fresh OS.
- Downloads language and base files for installation.
- Installs various Perl modules through CPAN and other required packages with yum.
- Downloads and compiles PHP and Apache with various associated modules.
After that you need to complete the installation wizard from its web based interface and you can access WHM with the following URL.
http://your-server-ip:2087

OR

http://your-host-name:2087
cPanel will open up its web interface like similar to below.
Please login with user “root” and your password. There are some more clicks remaining to complete the cPanel installation. Agree End User License Agreement by clicking “I Agree?/Go to Step 2” button:
cPanel Network Setup
Add Hostname
Setup IP Address
Setup Name Servers
Add Name Server
You can select FTP server of your choice from this wizard, which you want to use for your server depending on their advantages, disadvantages and depending upon your ease and requirements.
FTP Configuration
Mail Configuration
Setup Cphulk Brute Force Protection
Setup User Quotas
cPanel Server Configuration
Sometimes, cPanel installer script is not able to update the licence because of firewall or resolvers entries and you’ll see trial warning in the page. You can do it manually with following command.
root@server1 [~]# /usr/local/cpanel/cpkeycltAs I told you above that Cpanel is for user level access and WHM is for root level access, you need to create an account with option available in WHM. Here I have created an account with the username “tecmint” to show you the view of cPanel for users. Please see the image below.
cPanel Preferences
CPanel Backend Files
- Cpanel directory : /usr/local/cpanel
- Third Party tools : /usr/local/cpanel/3rdparty/
- Cpanel addons directory : /usr/local/cpanel/addons/
- Base files like Phpmyadmin, skins : /usr/local/cpanel/base/
- cPanel binaries : /usr/local/cpanel/bin/
- CGI files : /usr/local/cpanel/cgi-sys/
- Cpanel access & error log files : /usr/local/cpanel/logs/
- Whm related files : /usr/local/cpanel/whostmgr/
Important conf files
- Apache configuration file: /etc/httpd/conf/httpd.conf
- Exim mail server conf file:/etc/exim.conf
- Named conf file : /etc/named.conf
- ProFTP and Pureftpd conf file :/etc/proftpd.conf and /etc/pure-ftpd.conf
- Cpanel user file: /var/cpanel/users/username
- Cpanel configuration file (Tweak settings) : /var/cpanel/cpanel.config
- Networking configuration file: /etc/sysconfig/network
- Addons, parked and subdomain information: /etc/userdomains
- Cpanel update config file: /etc/cpupdate.conf
- Clamav conf file: /etc/clamav.conf
- Mysql configuration file: /etc/my.cnf
- PHP ini conf file : /usr/local/lib/php.ini
Reference Links
cPanel/WHM HomepageFor now that’s all with Cpanel installation, there are so many features in Cpanel and WHM which help you to setup web hosting environment. If you face any problem with setting up Cpanel in your Linux server or need any other assistance like backups, restorations, migrations etc, you can simply contact us.
Till then, Stay connected with Tecmint.com for more exciting and interesting tutorials in future. Do leave your valuable comments and suggestions below in our comment section.
Source : http://www.tecmint.com/install-cpanel-whm-in-rhel-centos/
Recently I actually have ordered a vps from Phi9 net host. once the roaring installation of cPanel, everything works fine.
RépondreSupprimerThank you for your nice article. plesk offshore technical support service
Thanks, I admire the valuable information you offer in your articles. i would recommend 24x7ServerSupport because they provide cpanel server management which is available 24x7 to solve all your cPanel server issues at the affordable prices. Get your cPanel server support now!
RépondreSupprimer